Monday, June 25, 2012

Hurry!  Hurry!  Let's Make Curry!


I apologize for my corniness...

Anywho...one of Matt and mines favorite restaurants here in Wilmington is called Indochine.  It is an amazing Thai restaurant with a delicious menu which includes a wide variety of curry dishes!  We are big fans of going out to Indochine, but going out is expensive and making our own versions of food we love to order when we go out is one of our favorite things to do!  Luckily for us, we live less than five minutes away from an Asian market who has a wide variety of Thai ingredients, including many great choices of curry paste!  Matts favorite curry dish at Indochine is Jungle Curry, while mine is Panang Curry...and we happened to find Panang Curry paste at the Asian market!  So, we decided to make our own curry at home and invite a few friends over to join us!


So to make curry, you need a few basics.  From there, you can add pretty much any ingredients you think would be tasty.  To me, there's really no rhyme or reason to it.  It really depends on personal preference and what you thinks would go well with the particular curry paste you are using.  Curry ranges from bold, spicy red to grassy green to mild, mellow yellow.  There are also other varieties that have slightly different flavors such as Massaman and Panang, which is what we made.

The basics you need for curry are usually some type of stock (chicken, vegetable, etc.), coconut milk, and of course the curry paste.

For our curry we decided to do a hybrid of what is found in the Panang Curry at Indochine and some of our favorite Asian vegetables found in many dishes.  We went with chicken, sweet potatoes, green beans, baby corn, and bean sprouts.


First, Matt cooked the chicken in a skillet with a little salt and pepper.

Meanwhile, I combined the two boxes of chicken stock, three cans of coconut milk, a few small spoonfuls of curry paste and the cubed sweet potatoes.


We brought this to a boil and let it simmer until the sweet potatoes could be poked through with a fork.  Next, we added the cooked chicken, green beans, baby corn, and bean sprouts.

In order to thicken the curry, we allowed it to simmer and reduce...meanwhile, we added a little cornstarch (about 2 TBS total) here and there to achieve a thicker consistency.


Curry is definitely best when served over top of rice (in our opinion).


Everyone seemed to enjoy it!  We all went back for seconds and in some cases, thirds!  It was a great dinner.  I hope you will try your hand at curry sometime.  It was fun and simple and DELICIOUS.

ENJOY.


Sunday, June 24, 2012

Oh, um...YUM.


You may or may not know...and if you didn't, now you do know...I love coconut.  Well, don't just love...I LIVE coconut.  I use coconut body wash, coconut body lotion, coconut body spray...I love coconut milk, coconut drinks, coconut custard on my toast, coconut oil, coconut candies...coconut ANYTHING. So naturally, while on my mission to make pie, I decided to make coconut cream pie!


While I found this recipe online, after reading the comments on the recipe, I decided to change it up a bit.  So, while I will link the recipe at the bottom of the page, you will find that it has been changed slightly to make a tastier end product.


So, first things first.  I made this pie in the morning.  Therefore, I needed COFFEE.  Yay!!!

Okay, moving on!  :)

For the recipe, I used:
1 1/2 cups half and half
1 1/2 cups coconut milk
2 eggs, beaten
3/4 cup white sugar
1/2 cup all purpose flour
1/4 teaspoon salt
1 teaspoon vanilla extract
1 cup sweetened flaked coconut
1 9 inch pie crust (I bought shortbread crust...YUM)
1 cup Cool Whip


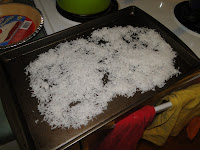
To start, preheat the oven to 350 degrees and toast a pan-full of coconut until it's golden brown.


Next, in a saucepan combine the half and half, coconut milk, eggs, sugar, flour, and salt and heat over low to medium heat.  Stir the mixture constantly and bring to a boil.  


Once the mixture comes to a boil, remove it from the heat and stir in 3/4 cup of the coconut and the vanilla extract.  Pour the filling into the pie shell and refrigerate until firm for at least four hours.  


After the pie has chilled, top with cool whip and sprinkle with the remaining 1/4 cup of toasted coconut.


ENJOY!


Thanks to www.allrecipes.com for recipe and to the other site users who suggested replacing some of the half and half with coconut milk.
http://allrecipes.com/recipe/old-fashioned-coconut-cream-pie/


Saturday, June 23, 2012

Let There Be Pie!


PAH.  I LOVE PAH.  Or...pie...PAH!  Sometimes I forget how much I really love pie...I just remembered again the other day!  So, it's summertime and the strawberries are just about getting to their "icky" point in the grocery stores.  We are at that cusp where local strawberries are going bad and all that will be left is the strawberries flown in from goodness knows where!  So, my mission was strawberry pie...wait, no....strawberry RHUBARB pie.  If you have never had strawberry rhubarb pie, let me school you on this ridiculously delicious pie. It is the perfect sweet and tart pie with the most delectable texture and pie-ey goodness!  

For my pie, I decided I wanted to go all out and make my very first crust from scratch!  Therefore, I combined two different recipes I found online...a basic pie crust recipe (of which I will keep in my recipe book for future use) and a strawberry rhubarb pie filling recipe!

Here's how it went...

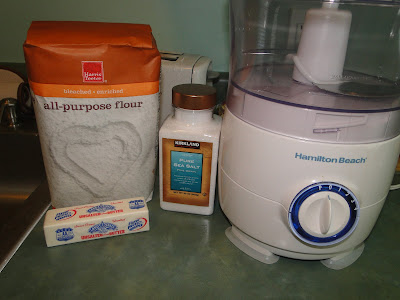
1 1/4 cups all-purpose flour
1/4 teaspoon salt
1/2 cup butter, suuuuuper cold and cubed
1/4 cup ice water
In my food processor, combine the flour and salt...then, while pulsing the food processor, add a few cubes of butter at a time...once the butter was incorporated, quickly add the ice water and pulse it yet again. Just a note: when making a pie crust, be sure to work quickly...the colder the ingredients, the better the crust will turn out. Once the mixture has pea to lima bean size lumps in it, quickly press the mixture together to form a dough ball. Wrap the dough in plastic and refrigerate for at least four hours.


I made two dough balls because I needed one for the pie shell and one for the top of the pie!  After refrigerating, remove the dough from the plastic wrap and lay it out on a floured surface.  Patiently (yes, this did take some patience) roll out the dough to the size needed to line the pie dish.

(Yay for badly focused pictures...oops)


And now, THE FILLING.

1 cup white sugar
1/2 cup all purpose flour
1 lb fresh rhubarb, chopped
2 pints fresh strawberries


Chop the strawberries and rhubarb!  I basically halved or quartered each strawberry depending on the size of the berry.  For the rhubarb, I sliced down the rib of each piece and cut it into about 1/4'' pieces.  Rhubarb is fairly bitter, so I wanted to be sure that the pieces were small enough that they would could through and be tart instead of bitter.


Combine all of the pieces together in a large bowl and add the sugar and flour. Take a little time to be sure that each piece is coated.


Let the berries and rhubarb sit in the sugar and flour coating for about 30 minutes to begin creating a saucy sweet goodness :)

Pour the strawberries and rhubarb into the pie shell and top with a few pats of butter.


Gently lay the second rolled out dough in top of the filling.  Press together the dough in order to create a seal for the pie.  Cut a few slits in the top of the pie to vent during baking!
Bake at 400 degrees for about 30 minutes, until golden brown.


Just look at that bubbly goodness...ENJOY.

Thanks to www.allrecipes.com for the recipes for this pie.
http://allrecipes.com/recipe/butter-flaky-pie-crust/
http://allrecipes.com/recipe/rhubarb-and-strawberry-pie/

Sunday, June 17, 2012

Bad blogger!  No treats for you!


Okay, so in the midst of my concerted effort to write meaningful and silly blogs for you lovely readers, I have found myself in the last week on a hiatus!  Unfortunately, we had a loss in Matt's family and ended up having to return home to the Outer Banks for an unplanned four days.  We had a great time seeing friends and family and spent a meaningful day with Matt's family to celebrate the life of his grandmother.  After returning back to Wilmington, I will honestly say that I was lazy.  So here I am, over a week later, finally writing a post!  Unfortunately, this one won't be complete with some silly pictures...those are soon to come!

I do want to say however, I have been keeping up with my pushup challenge and just completed my third day of week 2.  I went from doing 7 measly pushups in a row last week to actually completing 15 in a row tonight after four sets of at least ten!  I felt accomplished.  

Since I'm one of those people that feels the need to have someone to push them into actually doing workouts, I have decided to also take up two more challenges offered by the same website...The 200 sit-up challenge and the 200 squats challenge!  I started with Day 1 of Week 1 on both challenges today after doing the initial test a few days ago.  Since I'll be starting Day 1 of Week 3 in the pushup challenge on Wednesday, I'm going to go ahead and repeat the Day 1 of the other two challenges then.

In other news, I received an email from Michael's craft store in response to my application a few weeks ago and they have asked me to call them to set up an interview!  Now, this is no marine biology job...however, it's something!  I get to hang out in a place filled with arts and crafts supplies!  Yay!!!  Soooo wish me luck on my interview and I promise this week I will have a new, fun post with pictures included!  :D

Friday, June 8, 2012

I WILL be able to do pushups again.


So, as many of you may know...and some of you may not...I used to take karate.  Okay, well not just take karate...I LIVED karate off and on for about ten years.  I even received my black belt in the fall of 2002.  


Here we are!  We just finished a night of karate that started at midnight and lasted until 8 AM...we kicked, we punched, we broke boards, we ran 5 miles, we did 500 sit-ups, and we did...drumroll please...250 pushups.

After I received my black belt, I continued to attend karate classes for about a year and a half.  I found myself however in the middle of my high school years, with a new, older boyfriend and interested in many new extracurricular activities with my friends.  I slowly started to drift away from karate and eventually ended up not attending class at all by the end of my junior year in high school.

These days I consider myself a fairly active person.  I work out a few times a week.  I do yoga from time to time.  I even trained for and ran my first 5K during the spring this year.  I consider myself to be in okay shape.  


However, my one down fall since leaving karate is that I can no longer do pushups.

In karate class, we did A LOT of pushups.  Not only did we do normal pushups, but we also did pushups on our knuckles and even did them on our fingertips!  How I did this, I can't even fathom today.

Well, I am out to change that!


Basically, you do an initial test in order to find out your ability to do pushups.  I was humbled by my lack of ability...I could do a whole six pushups without collapsing.  Therefore, I have decided to take on this program and to train myself to do pushups once again!

So, if you are looking to get yourself into pushup shape...join me!  I would love some buddies who are up for the challenge as well!


Thursday, June 7, 2012

If you love Grilled Stuft Burritos, you will love me!!!


So if you are like me, when Grilled Stuft Burritos from Taco Bell came out, you were one happy, stuffed-full-of-burrito-goodness camper!  I used to get one of these delicious creations every time I made the relatively short, but seemingly long drive a few towns away to the nearest Taco Bell.

Well, as I've gotten older and a little more health conscious (even though I still enjoy a nacho cheese chalupa from time to time), I have become only an occasional patron of Taco Bell for the sheer fact that I really like to know exactly what is going into my meals.

Therefore, I decided to attempt making my very own homemade Grilled Stuft Burritos!


This creation happened to be one of those creations that we only had to buy a few of the ingredients needed since we already had more than half of them in the kitchen!

The basics of the Grilled Stuft Burrito from what I could remember was beef, beans, rice and cheese.  I am aware that sour cream was part of the recipe...however, I was never a fan of the sour cream and unfortunately for Matt (who loves sour cream), we forgot to pick some up.  

Of course, you can't have mexican food without Valentina Hot Sauce and pickled jalapeños!


I like to think of myself as a "Burrito Artist"...this is much like a Subway "Sandwich Artist" but more delicious!  :D

I layered cheese, rice, beef, jalapeños, beans, and of course MORE CHEESE!


You can't have a Grilled Stuft Burrito without grilling the burrito!  This is how I originally decided that we could pull of this delicious creation...we have a panini grill!!


After grilling for just a minute or so...my burrito had turned into cheesy melty goodness


I hope you will be inspired to make this creation at home as well!

Enjoy!


Wednesday, June 6, 2012

Rainy days make GREAT baking days!


Today I wanted to make food.  Not just any food.  Good food!!  While on my mission to save money while attempting to truly enjoy life, I've been working on finding recipes that use a lot of things we already have in the house with just a few extras that make the dish.


So, on my search to make delicious, budget-friendly food, I came across a great recipe that I only need two new items for!  My inspiration for looking up this recipe came from the sheer fact that Matthew loves blueberry anything and they happened to be on sale at Harris Teeter!  Therefore, for an entire $6 I was able to make delicious (somewhat) healthy scones!


Although after the finished product was revealed, they were not so much scones as they were biscuits...they were still super tasty!


1 1/2 cups all purpose flour
1 1/4 cup old-fashioned oatmeal
1/4 cup sugar
1 tablespoon baking powder
1/4 teaspoon salt
1 teasoon lemon zest
1/2 cup unsalted butter, melted
1/3 cup milk
1 egg, beaten to blend
1 cup fresh blueberries 

Preheat the oven to 450 degrees.  Meanwhile, gather thy ingredients!  

Combine the first six ingredients in a bowl.  


In a separate bowl, combine the wet ingredients (melted butter, milk, and egg).  Beat the egg until the wet ingredients are blended.  


Add the wet to the dry and mix lightly until all of the ingredients are incorporated.  Gently mix in the blueberries.  Spoon out the dough and form into the desired shape you want (it's very doughy so I just made balls).  Line the dough balls onto a cookie sheet lined with parchment paper.


Look at that blueberry goodness!


Bake at 450 degrees until golden grown...about 15 minutes.
Remove from the oven and place onto a cooling rack.


Enjoy!!!


Thanks to Yummy Mummy for the Healthy Blueberry Oat Scones Recipe.


Sunday, June 3, 2012

Save the Date Madness!!!


So, in my quest for a budget-friendly wedding, I have decided to take on the task of creating my own save the dates!  Although it has definitely been budget friendly (less than 75 cents per), it has been a little time consuming.  However, I am excited to feel the intense satisfaction of saving money and being a crafty bride! 


Let me show you how I made them!


Welcome to Hillary's Craft Corner!  
(much to the dismay of my lovely OCD fiancé...)


All of my materials came from Michael's Craft Store by the way!
Here are the AWESOME card stock and envelopes that came in all sorts of cool colors, including my wedding colors, purple and green!  The box came with 100 envelopes and 100 cards in 8 bright shades!  This was a perfect buy for me because not only was the box only $20, but I had a 40% off of one item coupon (yay me!), but I can use the colors I don't need for my saves the dates for other cards I want to send people!  If you know me well, you know that bright, crazy colors are definitely what I am drawn to.


 I found these great metallic, opaque markers that were perfect for use on the bold colors of the card stock I bought.  The theme of our wedding is a sort of springy, rustic feeling with lots of nature...we are going to have lots of flowers and branches all over the place, so I free-handed gold branches with green flowers on the purple cards and purple flowers on the green cards.


When Matt and I first started dating, we were really into a band called Carbon Leaf.  They have an awesome song called "A Life Less Ordinary" that we have ordained as "our song".  This has been a sort of mantra for our relationship, so what could be more fitting than to incorporate it into our wedding?


As a finishing touch, I sealed each envelope with a bride and groom stamp using white ink.  :D
Fitting isn't it?


Saturday, June 2, 2012

Badger, badger, badger, badger, SNAAAAAKE!


So, to begin this story I must give a short introduction and history of said SNAAAAAKE!  


My best bud Becca lived with myself and my fiancĂ© for about a year here at our apartment.  Becca and I liked to spend time on the back patio and sit in the sun to chit chat.  One day last summer, we found ourselves being stalked by a little black snake.  We would get into a conversation and suddenly would realize that this snake was hanging out right next the patio, usually with his head up off of the ground right next to Becca.  Well, we didn't really see much of him for the rest of the summer...

The creeper snake has made a comeback!

This is a picture of my cat sitting on our bed.  And that in the background sticking out of the bush...creeper snake.
Yes.  The snake is peeking in on my bedroom.
Snake photobomb!!!


It took a few minutes, but Gwenhwyvar finally caught on...